To create successful final images and to be fully prepared for a shoot, test shooting either on a model or yourself is vital. I felt the best way for me to practice with techniques and make-up application would be to make-up myself to see how the design transferred from paper to face and whether from this I could see any elements that needed re-working or changing completely. Completing this process has really opened my eyes to how I actually want my designs to look, as sometimes original face charts don't transpire so successfully onto the model's face. I've decided to change some aspects of my make-up designs in order to push my make-up skills and the characters looks further and to use this opportunity and this unit to show my creative and design capabilities.
Test Shoots
A range of test shoots that I felt were most successful.
 |
| This is a test shoot of the evil witch in the original story of Hansel & Gretel. The elements of this look that I like are the colour choices of green and black as they are in keeping with the theme of the forest. I also like the shaping of the eyes and how the two colours blend together on the lid, however upon reflection I would bring the eyebrows in to more of a point at the nose and block out the model's eyebrows before hand so I can create a much higher unnatural arch to automatically give the character an evil look. I'd also go even further with the depth of the contouring and shape of the lips to really accentuate witch like features such as a pointed nose and chin, another technique I could use to created the illusion of a more pointed nose is to paint black above the nostrils, adding to the natural nostril line. |
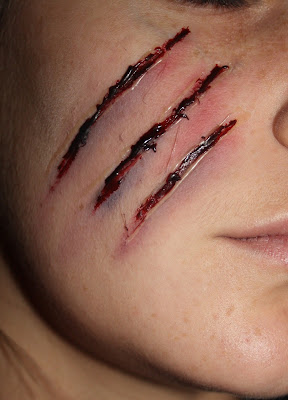 |
| This is a test shoot of the cuts that will appear in the second make-up look of Little Red Riding Hood to show the violent attack from the wolf. I tried and tested a few different make-up products when test shooting this technique - derma wax, gelfix and tuplast, this image is the cuts I created with tuplast (a clear thick gel that can be manipulated on the skin before it dries). I like the shaping of the cuts here but I feel that shot from a further away angle that they might get lost in the picture and won't be as clear and striking as I'd hoped. To make the cuts look more obvious and to convey a clearer message I will bring the cuts further down the face so that they cover most of the cheek. Here I have created quite light bruising as I was afraid it would look unrealistic however for it to show up well on camera I would use more colouring of blue's, red's and black's around the cuts to emphasis the bruising and depth of the cut. |
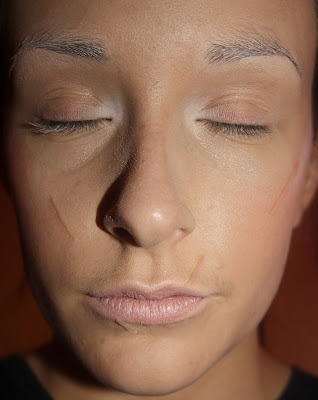 |
| As with the image above I used the same product of tuplast to create the scars that Rapunzel encounters during a moment of mad rage whereby her step mother violently chops off all of her hair. Under this lighting the red ben nye colour that I add to the tuplast scars isn't as harsh or visible as I would have like so I will use more red in the actual shoot on the one side of the scar and on the other side I will use more white to highlight the texture of the tuplast and to create the illusion of height to the scar. |
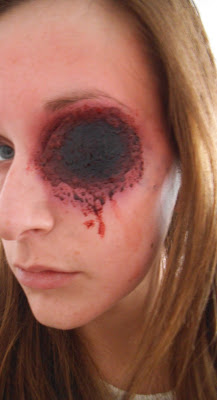 |
| This image is a test shoot I did on myself as part of the story line in the original fairy tale of Cinderella whereby at the end of the tale the ugly sister gets her eyes plucked out by birds for her wicked and evil ways. This is a self taught technique that I picked up through researching special effects techniques on the internet. To create this look I used black cardboard, derma wax, a bruise wheel and stage blood and to create it was actually easier than it looks. I feel with more preparation time and professional studio lighting the technique will be successful in showing that element of the story and won't look so obviously like black cardboard but more like a black hole full with blood. |
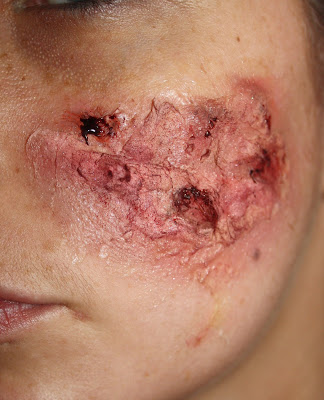 |
| This was a test shot of burns that I did for the second make-up look of the witch in the fairy tale Hansel & Gretel whereby Gretel pushes the witch into a open oven of fire that burns her miserably to death. Through my keen interest in special effects I attended a six week special effects course so I feel confident in creating wounds such as burns, bites or cuts. To create this technique I used cotton wool and latex stuck to the skin in layers to create depth and texture to the burn. I'm really happy with the outcome of this test shoot as I feel it looks really realistic, the only difficulty I might face when shooting this look is trying to keep continuity with both colour and texture as it will cover a larger area of the face than here. |


No comments:
Post a Comment